Sunday, January 7, 2024

Decoupage a Christmas Seashell Ornament

If you would like to learn how to decoupage a seashell to turn it into a beautiful Christmas ornament, then you have found the right place!


You can click on any of the underlined words throughout this post to learn more about each item. 

You may already have some seashells from a past trip to the beach.

Or, perhaps when you visit a beach this summer, you will keep this project in mind when you are out there on the beach collecting shells like everyone else because they are so fascinating but at the same time not knowing what you are going to do with them when you get home! haha...

I would love this beach!!!

There are quite a few shapes that would make wonderful ornaments...


Oyster Shells


Clam Shells


Violet Clam Shells 
 

Before we begin, please take the time to read information below to help you get set up for this project.

----------------------------------------------------------------------------------------

In this post, I will outline for you through step-by-step instructions, pictures, and video presentations how to make a decoupaged shell ornament using any picture you can find online from one of your favorite search engines.

My absolute favorite search engine is PINTEREST and that is the one I will use for this tutorial.   Pinterest is a lot like Google, but it's more of a visual search engine.  There you will find many wintry Christmas scenes that would be perfect for this ornament project.

If you are need of getting an image for your seashell ornament, may I recommend using the following search terms on Pinterest such as...  "wintry Christmas scene", "snow scene", or "Christmas scenery" just to give you an idea.

If you click on the underlined article below (in red lettering), you will be instructed on how to go about getting your 'wintry Christmas snow scene' image from PINTEREST. If you follow the directions in that article, you should be able to resize any image you want to use for this project to fit your ornament:

Learn How to Resize Pictures and Print from a Word Processing Document

Keep in mind that the article linked above explains the resizing process using different terms (it uses 'hummingbird' and 'garden flowers'), however when you do your search for this shell ornament project you will probably want to use terms like winter, Christmas, snow, wintry, skaters, skating, Christmas tree, etc. - you get the idea!

If you need assistance with any of the steps, please leave a question in the 'Comments' section below on this page, I will be happy to help!

You will need to gather some of the supplies listed below.  You may, or may not, need all of these supplies, however, if you need help with attaining any of these items or just want more information, you can click on the underlined links to learn more. 

Disclaimer:   As an Amazon Associate, if you do happen to make a purchase, I will earn a commission (at no cost to you, so thank you so very much if you do!).

You may want to watch a short video explaining the basic outline to make this Christmas seashell project.  It is linked for you here below...


SUPPLIES:

   1.  Printed Christmas scene image (more in STEP 1 below)

   2.  Blank Christmas ornaments

   3.  White Acrylic Paint

   4.  Foam paint brush

   5.  Gift Tissue or White Kitchen Napkin

   6.  Inkjet Printer

   7.  Computer Paper

   8.  Scotch Tape

   9.  Mod Podge

 10.  Clear Elmer's Glue

 11.   Rhinestones

 12.  Dimensional Snow

 13.  Glitter

 14.  Pebeo Gold Lining Paint

 15.  Bows

 15.  Glue gun


"How to Turn Gift Tissue into Paper you can use for Decoupage Projects"


Are you ready??  Let's begin!...


STEP 1

Finding and Choosing an Image

1.   Go to your favorite search engine (I like PINTEREST).

2.   In the search bar at the top of the page, type in the words that help describe what kind of image you're looking for, i.e. "Christmas scenery", Christmas skaters, Christmas tree snow scene.  Your results should look something like this...


There are so many to pick from, it will be hard to choose!

3.   From the search engine results, decide which image you would like to place on your ornament.  After you make your decision, move on to the next step below.


STEP 2

Downloading Image to a Word Processing Document

4.   Using your mouse, hover over the image you've selected, and 'left click' on the image two times to bring a larger version of the image to the top of the PINTEREST page as shown below... 


5.   Next, 'right click' on the larger image at the top of the page and select 'Copy Image' from the choices that appear in the menu that pops up as shown below...


6.   In an open word processing document, select 'Paste'.  Your image will look like this when in the WP document...


STEP 3

Use the Format Keys to Resize and Frame the Image

7.     Now that your image has been pasted into the word processing document, use your mouse to grab the circle on the corner of the image (see pictures below), 'left click' on the corner and move your mouse back and forth to make your image the size you need to fit the specific ornament you are making...


Use your mouse on the corner of the image to make it bigger or smaller


8.     The image on the screen will be true to size when it is printed so move the black line around the image with your mouse back and forth to get it to be approximately the size you need for the specific ornament you are making.  Holding your shell up to the screen will help you determine approximately what size you need the image to be.

9.    You may want to change the shape of your image too, so once you get the image size close to where you need it to be, 'left click' on the image once again (while it is still in your word processing program) to get that black line around it once again.

        After you left click, you should see the 'Picture Format' pop up at the top of the screen.  Click on 'Picture Format' and you will see different shapes show up.  These are called 'Picture Styles' and will give you choices for the edges of your image.  Select 'Soft Edge Oval' (or whatever style you would like to use).  See the pictures below for reference.

 
You can use the 'Picture Format Keys' again
to make your image wide or narrow too.
Remember to click on the image to bring
the keys up to the top of the page.   To make the
image wider, grab the side of the image with
your mouse and move left or right.  You can
also change the color of your image with
these keys as well.

10.  I use 'Soft Edge Oval' for my ornaments as shown above.  In the 'Picture Format' is also where you can change the color and transparency of your picture.

11.   If you are printing your image on gift tissue, make sure you have applied a coat of dried white paint on the surface of the ornament before gluing it down.  However, it's not necessary for this to be done if you're using regular computer paper print outs.

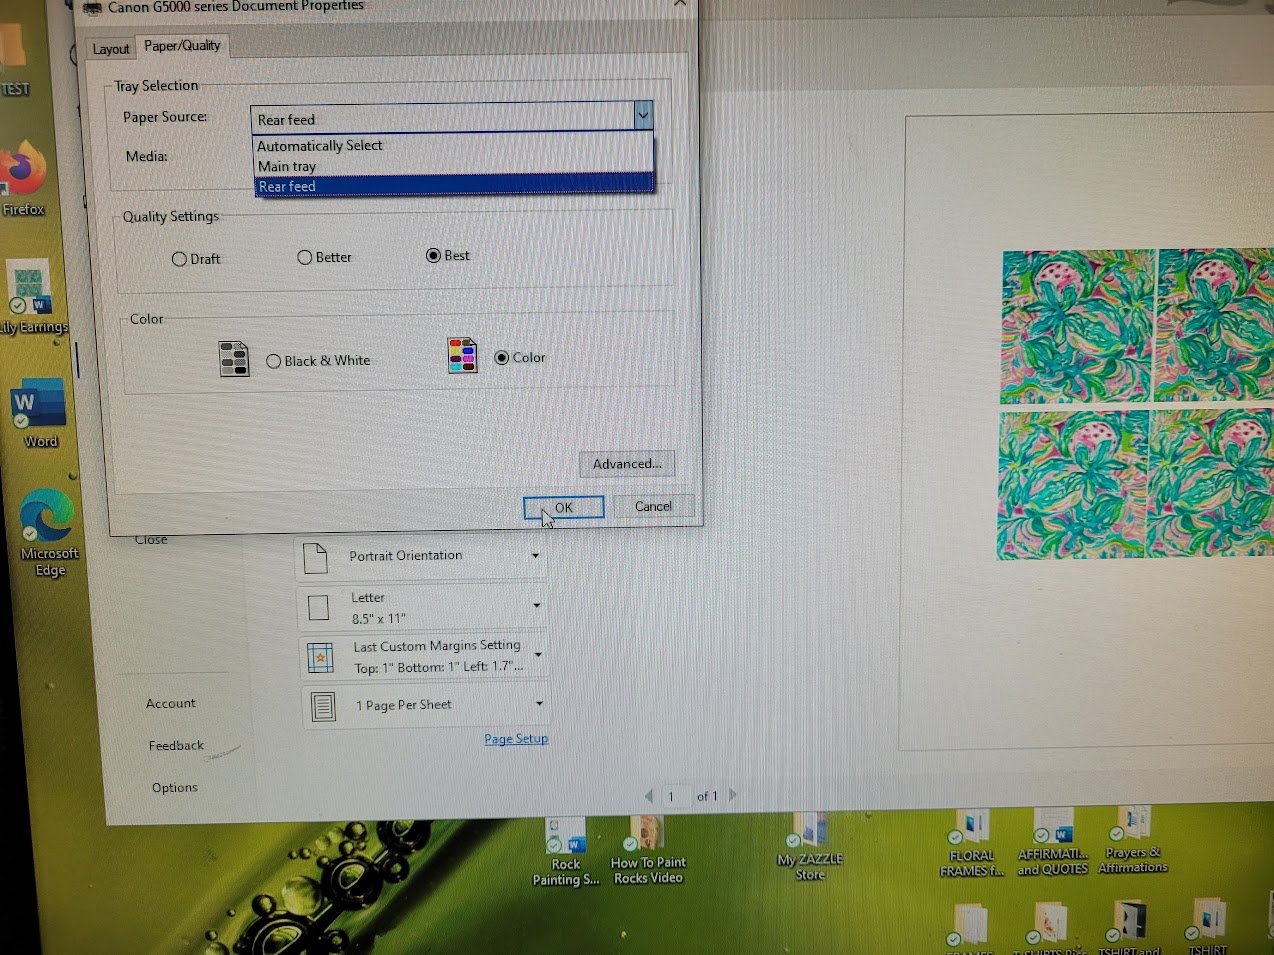
12.   Print your image out onto computer paper or onto the gift tissue affixed to computer paper (see video above "How to Turn Gift Tissue into Paper you can use for Decoupage Projects")

           Cut the image from the paper and secure it to the front of your ornament using clear glue.  You can use a glue stick, but I like to use a thin layer of clear Elmer's glue. 


  13.    Embellish your ornament with dimensional paint, glitter, or flatback adhesive pearls and rhinestones, and don't forget the ribbon and bow which need to be added to the top using a glue gun for extra strength!  Seal your ornament with Mod Podge. 


I really hope you enjoyed this tutorial!  Thank you for being here!


-------------------------------------------------- 
 
Decoupaged Tissue Christmas Ornament


PART 1 - "How to Print an Inkjet Image on a Tissue for Decoupaging"


PART 2 - "How to Find an Image, Resize and Download it to Print"


PART 3 - "Trimming the Image and Applying the Mod Podge"


PART 4 - "The Finishing Touches, Glitter and all that Fun Stuff"


--------------------------------------------
 
(click link above for video instruction)


--------------------------------------------


Please visit my other blogs (click link below each blog's cover picture)...


Please follow me on INSTAGRAM!


PAINTING FLOWERS ON ROCKS 
The book that started me on my rock painting journey


Sunday, July 31, 2022

Decoupaged Wooden Earrings Tutorial

Hello, and thank you for joining me for this tutorial on how to use the art of napkin decoupage to make beautiful one of a kind earrings like the ones pictured below...


Decoupaged Wooden Earrings
can be made with printed floral napkins


Aren't they just beautiful???

At this point before we begin, I would like to mention that you don't have to print your own patterns to do this project.

Why not you may ask; because there are many beautiful, pre-printed patterns that are available to purchase, just like the yellow roses on the earrings pictured above.

In addition to this note, the underlined words in blue print on this blog post are links to where you can shop for the specific item underlined

If you purchase anything through these links, I will earn a small commission at no extra cost to you.  Thank you in advance for any purchases you may make!

So, to reiterate, it's not necessary to print your own patterns for this earring tutorial, and you can skip those steps in the first few directions outlined below.

To give you an idea of what's available for purchase online, pictured below is a very pretty pattern on a napkin that I think would make a beautiful pair of earrings... 


Floral Napkins are readily
available online too

(click link above to learn more)


This is just one of the
many shapes available online


If you painted the background of your earring in a very light teal color and used the printed napkin above, the result would probably be similar to this...


A few more things before we begin...

Pre-Steps:

Before printing out a picture on a napkin, you will have to secure a plain white kitchen napkin to a piece of computer paper.

If the napkin is two-ply or three-ply, unfold it and peel it down to one ply before attaching it to the computer paper.

Then secure the napkin to a piece of computer paper with Scotch tape.  For more information about exactly how to do this, watch the video below...


"How to Make Napkin Prints for Decoupage Projects"


This is what it will look like...


Napkin secured to a piece of computer
 paper with Scotch tape before printing


Please find a SUPPLIES LIST below the DIRECTIONS with links to purchase next to each item for your convenience.

I have also created a video of the instructions outlined here on this blogpost if you would like to watch it before you begin.  Here is the link...


"Decoupaged Wooden Earrings Tutorial"


If you have any questions, please leave them in the 'Comments' section below and I will be happy to help you out.

Now, onto our project...


DIRECTIONS


Step 1:

  Finding a pattern


Go to Pinterest or your favorite search engine.  In the search bar, type a term for an image of something you would like to make into a pair of earrings.

You can use terms like 'Lily Pulitzer patterns' or 'mandala patterns' or 'floral patterns'.  Your search results in Pinterest for Lily Pulitzer will look like this...

'Lily Pulitzer patterns' search results in Pinterest


Step 2:

  Downloading the Pattern


From the search results, decide on an image you would like to make into earrings.  You are going to copy and paste it into a word processing document.


Place your mouse over the pattern of your choice, and while hovering over the image 'right click' on it to make it larger on the page.


Always save from the larger image to get the best results.


As shown in the picture below, hover over the image and using your mouse 'right click' and select 'Copy Image' (see pic below)...


'Copy image' from the larger version after hovering
over it and right clicking on it with mouse


In another window, open a new blank word processing document (or preferably have one open before you start).


While in the new blank document, 'right click' again and select 'Paste' so that now your pattern is in your word processing document (see picture below)...


'Paste' image into a blank word processing document


It might also be a good idea to print at least four of the same image, two for the front, and two for the back of each earring pair.


Step 3:

  Resizing the Pattern


Once your pattern is downloaded into the WP document, you can now resize it, recolor it, and also format it to print the image in reverse.

It might also be a good idea to print at least four of the same image, two for the front, and two for the back of each earring pair.   So go ahead and copy and paste until you have four.

You don't have to put the image on the back too, but this is something I like to do so that I don't have to paint it later. 

You won't want to leave it unfinished with no color so either two or four is fine, however, just remember if you don't print four, then you will probably want to paint the back.

In order to figure out the size for your images, hold your earring blank up to the image on the screen in the WP document.  See the picture below...


'Left click' on the image and a black outline will appear around the image as you can see in the picture above.  Place your mouse on the corner and move it back and forth to make the image bigger or smaller.

If you would like the image reversed for the second earring, flip it using the 'Format Picture' commands in WP at the top of the page before printing.

Now we are ready to print it out!


Step 5:

  Printing the Image onto a Napkin


Place your napkin/computer paper that you made in the Pre-Steps (outlined at the top of this page) in the rear tray of your printer...


From your word processing document, select 'File', and then select 'Print' at the top of the page.

Next, while in the print menu of your word processing document, you should see something like 'Printer Properties' as shown in the picture below...

You may have to look around your word processing
program for 'Printer Properties' this is what it
looks like on mine


For 'Paper Source' select 'Rear Feed'.  For 'Quality Settings' select 'Best'.  Select 'OK'.  Then select 'Print'...  


This is the result!

When it’s dry, use a paint brush to seal it with Mod Podge Gloss Finish.

Gently remove the napkin print from the computer paper.

On the back side of the napkin print, place your earring blank.  Use a pencil to trace the outline of the earring blank.

Carefully cut the napkin print out around the traced line.

Use a clear glue stick to secure the napkin cutout to the front of the earring blank.  Let it dry.

As you may see from the picture directly above, you may want to print out four of the same images so you can glue one to the back of each earring as well.


Step 6:

  Finishing your Earrings


After you add a bead and hook to your earrings, use Mod Podge to seal both sides of the earring.

To finish off the earrings, you may want to add a bead to the earring, to do this use will need a jewelry tool kit, jump rings and an earring hook.

In addition to a jewelry kit, you may want to get a pair of pliers to make the process of making loops extremely easy.  I love mine and would not know what to do without it for making the loops I need to make.

Watch the video below to learn how to use looping pliers to add beads...


Here is a list of SUPPLIES you may need:

Decoupage a Christmas Seashell Ornament

If you would like to learn how to decoupage a seashell to turn it into a beautiful Christmas ornament , then you have found the right place...