Hello, and thank you for joining me for this tutorial on how to use the art of napkin decoupage to make beautiful one of a kind earrings like the ones pictured below...
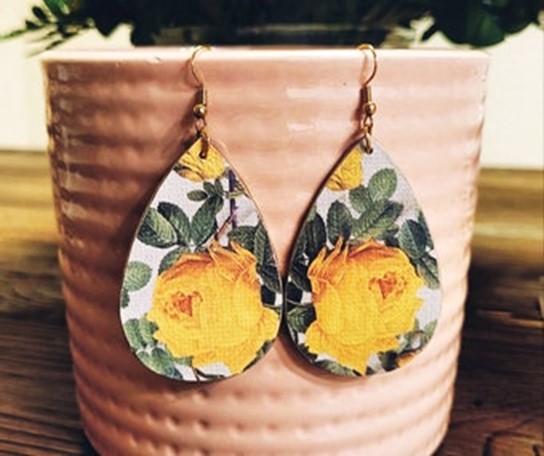 |
| Decoupaged Wooden Earrings can be made with printed floral napkins |
Aren't they just beautiful???
At this point before we begin, I would like to mention that you don't have to print your own patterns to do this project.
Why not you may ask; because there are many beautiful, pre-printed patterns that are available to purchase, just like the yellow roses on the earrings pictured above.
In addition to this note, the underlined words in blue print on this blog post are links to where you can shop for the specific item underlined.
If you purchase anything through these links, I will earn a small commission at no extra cost to you. Thank you in advance for any purchases you may make!
So, to reiterate, it's not necessary to print your own patterns for this earring tutorial, and you can skip those steps in the first few directions outlined below.
To give you an idea of what's available for purchase online, pictured below is a very pretty pattern on a napkin that I think would make a beautiful pair of earrings...
 | ||
Floral Napkins are readily available online too (click link above to learn more)
If you painted the background of your earring in a very light teal color and used the printed napkin above, the result would probably be similar to this...  |
A few more things before we begin...
Pre-Steps:
Before printing out a picture on a napkin, you will have to secure a plain white kitchen napkin to a piece of computer paper.
If the napkin is two-ply or three-ply, unfold it and peel it down to one ply before attaching it to the computer paper.
Then secure the napkin to a piece of computer paper with Scotch tape. For more information about exactly how to do this, watch the video below...
"How to Make Napkin Prints for Decoupage Projects"
This is what it will look like...
 |
| Napkin secured to a piece of computer paper with Scotch tape before printing |
Step 1:
Finding a pattern
 |
| 'Lily Pulitzer patterns' search results in Pinterest |
Step 2:
Downloading the Pattern
From the search results, decide on an image you would like to make into earrings. You are going to copy and paste it into a word processing document.
Place your mouse over the pattern of your choice, and while hovering over the image 'right
click' on it to make it larger on the page.
Always save from the larger image to get the best results.
As shown in the picture below, hover over
the image and using your mouse 'right click' and select 'Copy Image' (see pic below)...
 |
| 'Copy image' from the larger version after hovering over it and right clicking on it with mouse |
In another window, open a new blank word processing document (or preferably have one open before you start).
While in the new blank document, 'right click' again and select 'Paste' so that now your pattern is in your word processing document (see picture below)...
 |
| 'Paste' image into a blank word processing document |
Step 3:
Resizing the Pattern
You don't have to put the image on the back too, but this is something I like to do so that I don't have to paint it later.
You won't want to leave it unfinished with no color so either two or four is fine, however, just remember if you don't print four, then you will probably want to paint the back.

Step 5:
Printing the Image onto a Napkin
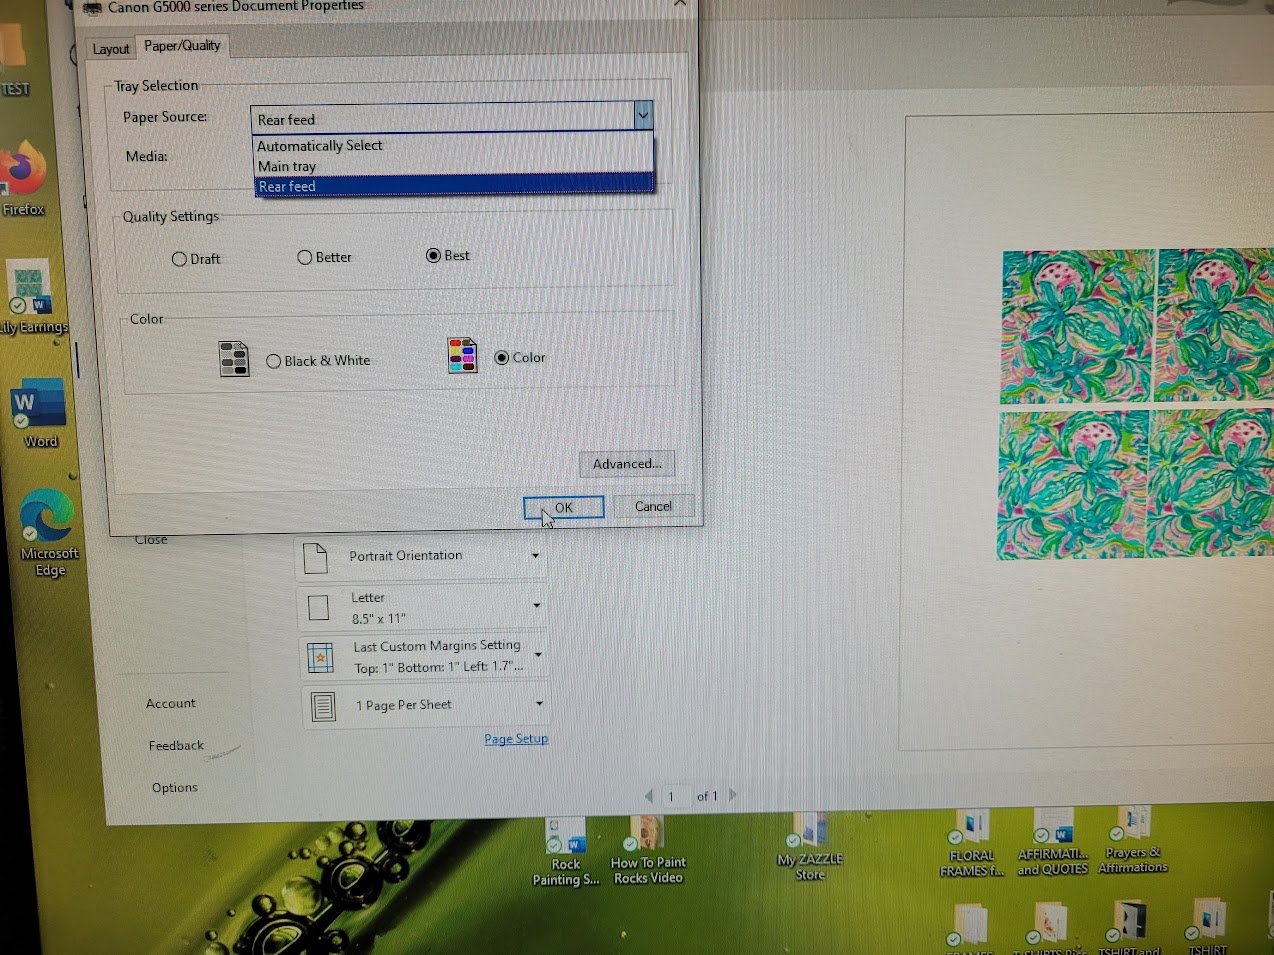
Place your napkin/computer paper that you made in the Pre-Steps (outlined at the top of this page) in the rear tray of your printer...

 |
| You may have to look around your word processing program for 'Printer Properties' this is what it looks like on mine |
 |
| This is the result! |
When it’s dry,
use a paint brush to seal it with Mod Podge Gloss Finish.
Gently remove the napkin print from the computer paper.
On the back side of the napkin print, place your earring blank. Use a pencil to trace the outline
of the earring blank.
Carefully cut the napkin print out around the traced line.
Use a clear glue stick to secure the napkin cutout to the front of
the earring blank. Let it dry.
As you may see from the picture directly above, you may want to print out four of the same images so you can glue one to the back of each earring as well.
Step 6:
Finishing your Earrings
After you add a bead and hook to your earrings, use Mod Podge to seal both sides of the earring.
To finish off the earrings, you may want to add a bead to the earring, to do this use will need a jewelry tool kit, jump rings and an earring hook.
In addition to a jewelry kit, you may want to get a pair of pliers to make the process of making loops extremely easy. I love mine and would not know what to do without it for making the loops I need to make.
Watch the video below to learn how to use looping pliers to add beads...
Enjoy your earrings!


No comments:
Post a Comment